
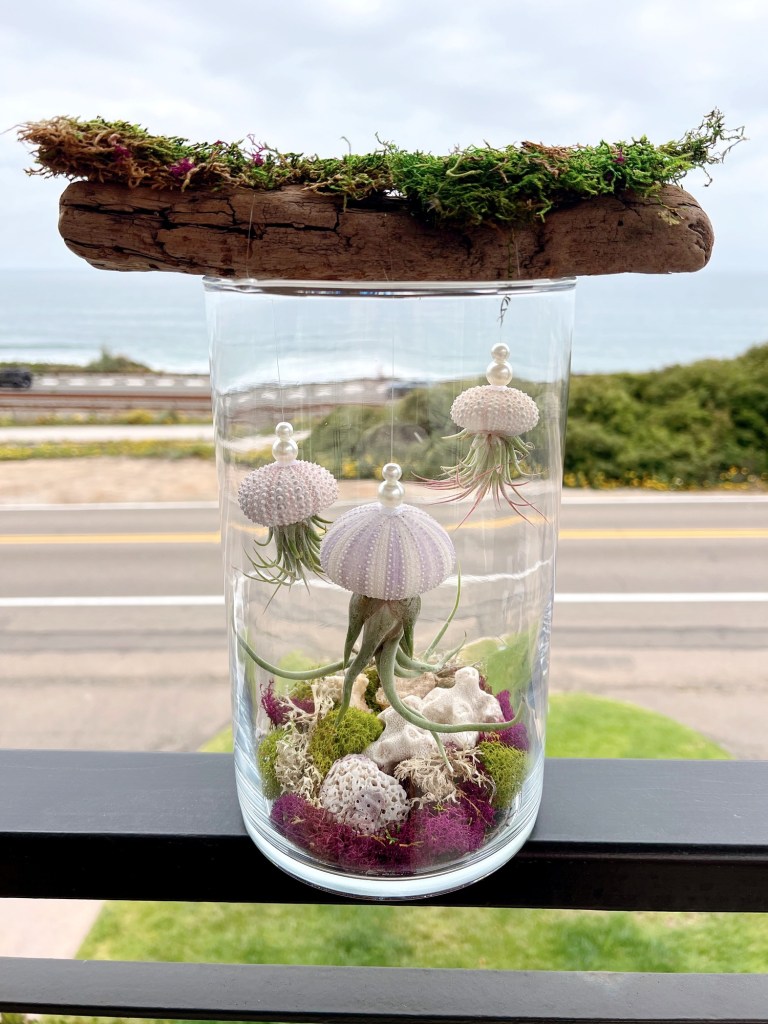
In this post – how to create an adorable jellyfish air plant terrarium.
Creating a jellyfish hanging air plant terrarium in a jar with moss is a fun and whimsical DIY project that combines natural elements with a coastal aesthetic. This is probably my favorite coastal craft project ever and it’s so simple! Here’s a step-by-step guide to help you craft your own!

Styled 2 Ways #9 – Coastal Craftiness
Welcome to this month’s collaboration with my friend MaryJo of the blog Master”pieces” of my Life. Every month we pick a theme and put our own spin on it. This month’s theme is coastal crafts. I’m excited to see what creative idea MaryJo came up with! Judging from her sneak peek pic at the bottom of this post, it’s gonna be good!

Supply List

This article includes affiliate links; if you click on a shopping link and make a purchase I may receive a commission. As an Amazon Associate, I earn from qualifying purchases at no additional cost to you.
- 10” Glass Cylinder Vase – with or without a lid, depending on your preference
- Air plants (Tillandsia) – to mimic the jellyfish tentacles, preferably with a bulbous head
- Transparent fishing line – for hanging the jellyfish from the driftwood
- Sea urchin shells – to resemble the jellyfish body (goes on top of the air plant)
- Hot glue gun and glue sticks
- Decorative moss – I used a multicolored variety package
- Pebbles, sand, sea glass, small shells, or coral (for bottom decoration)
- Piece of driftwood (long enough to span width of jar securely – approximately 6”)
- Scissors
- Pearl pony beads – small and larger sizes
Air Plant Jelly Fish Terrarium Supplies

Instructions:
Step 1: Prepare the Jar Base
No glue needed here! I simply picked out the moss I thought most resembled sea sponges and coral and placed them in the bottom of the vase. I made sure to use the pretty purple moss that was included in the Supermoss packet. You could also add some sand or pebbles to the bottom. (Just be sure to keep the layer fairly thin to have enough room to suspend the jellyfish above.)


Next, I gently placed some bits of coral around the bottom to make the ocean scene even more realistic.

Preheat your glue gun for this part.
Choose three air plants and sea urchin shells you intend to use. I used a small, medium and large size of each.

Step 2: Attach the Hanging Line
Cut a length of transparent fishing line approximately 16”-18” (you will trim the excess later.) Thread the cut piece of fishing line through one of the large size pearls and tie a knot to keep it from slipping off. Next, thread the line through the urchin shell so that the pearl is resting against the smaller opening on the inside of the shell.

Once the pearl is in place, gently lift the urchin shell up by the wire and put a small amout of hot glue on top of the pearl to secure it to the shell. Lastly, thread on two additional pearls so they rest on the top of the shell where you just glued. This is optional but I think it looks pretty!

Step 3: Create the Jellyfish “Body”
To create the jellyfish body, place a thin layer of glue around the larger opening in the sea urchin shell and gently press the stem end of the air plant in the opening. Hold until the glue cools. Repeat with the other two jelly fish.


Step 4: Assemble the Terrarium
Place the driftwood stick on top of the vase. Carefully lower the largest jellyfish air plant into the jar so that it hangs in the center. Adjust the hanging height to where you want it and tie a knot in the fishing line around the driftwood stick to hold it in place. Trim any excess fishing line. Repeat this step with the other two jelly fish, staggering the heights of each jelly.
If needed, adjust the moss and base decor so it frames the hanging plants nicely.


I glued some leftover moss to the top of the driftwood to disguise the fishing line and add a natural touch.

Step 5: Air Plant Maintenance Tips
Mist the air plant lightly 1–2 times per week, or remove it occasionally to soak in water for 15–20 minutes.
Keep the terrarium in indirect light (bright but not direct sun).
Make sure there’s good airflow — air plants need ventilation, so it’s important to leave the top of the vase open.
More Inspiration!
I can’t wait to see what MaryJo has to share on her blog “Masterpieces of my Life”. Be sure to check out her cute DIY life preserver ring here! You can also find her on Pinterest, Facebook and Instagram!

sharing @ between naps on the porch
Subscribe below to receive new posts weekly!
Featured on…


Sharing on…
https://esmesalon.com/tag/seniorsalonpitstop
Discover more from From the Bay to the Beach
Subscribe to get the latest posts sent to your email.

4 Responses
This is super cute Susan. I love organic decor and with the coastal vibes is perfect for your SD spot. Sea urchins are so cool and this is a great use for them. Great sharing with you today. XO- MaryJo
Thanks MaryJo! I’ve been wanting to try making one of these for a while! Another fun collab!
This is so cute and amazing. Love it, I have some air plants, so may give it a go.
Visiting via Karin’s Kottage
My entries this week # 55+56+57
Hope to see you also share with https://esmesalon.com/tag/seniorsalonpitstop/
Thanks Esme! Air plants are so fun!