
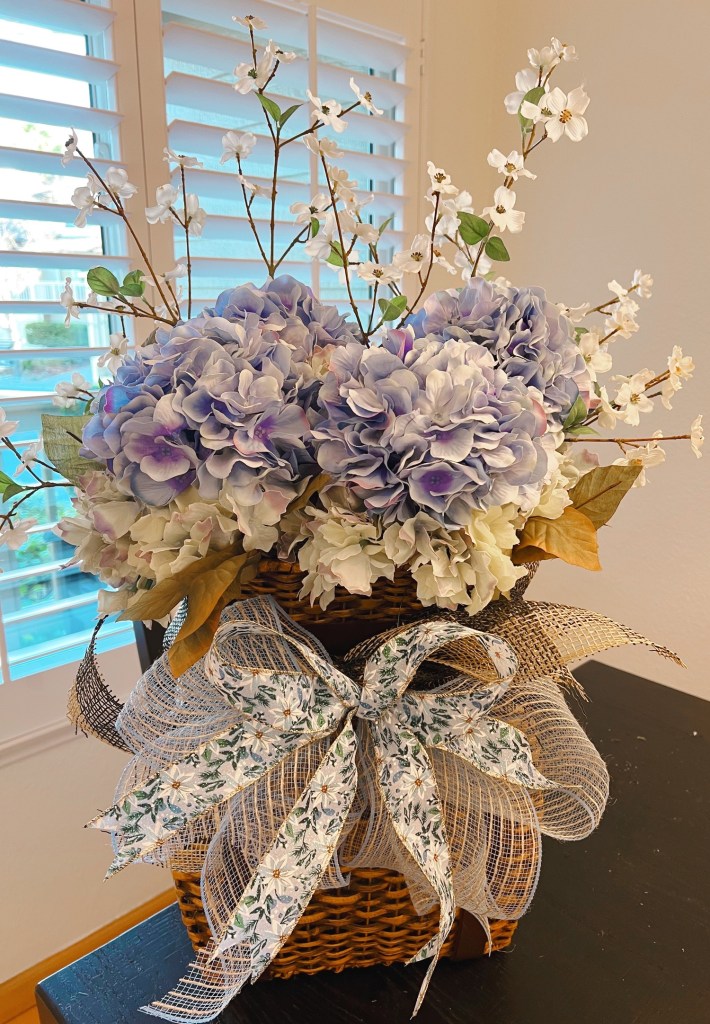
In this post – I’m sharing step-by-step details for how to style a pretty spring floral hanging basket.

Styled 2 Ways #6
It’s time for another awesome collaboration with the very talented MaryJo of Master”pieces” of my Life. This month we’re chasing away the winter doldrums by prepping for spring. In this S2W, we’re sharing our takes on spring basket decor. I can’t wait to see what MaryJo has been up to!

Prepping for Spring
Winter is the perfect time to curl up with a warm cup of coffee and make plans for spring. I like to prep my spring decorations early so they’re ready to go come March. In this post, I’m sharing how to make a lush and beautiful spring hanging basket for your porch or front door. For all of the details on how I prepped our small Bay Area porch for spring, be sure to check out Springtime Decor Inspiration for a Small Porch.

Supplies Needed

This article includes affiliate links; if you click on a shopping link and make a purchase I may receive a commission. As an Amazon Associate, I earn from qualifying purchases at no additional cost to you.
- hanging basket of your choice (I used one from Ballard Designs)
- floral foam
- floral wire
- faux floral stems (I used hydrangeas and cherry blossoms)
- wired ribbon (I used 3 different widths)
- dried moss
- and old wreath or other smaller blossoms to fill in any gaps
Spring Basket Supplies
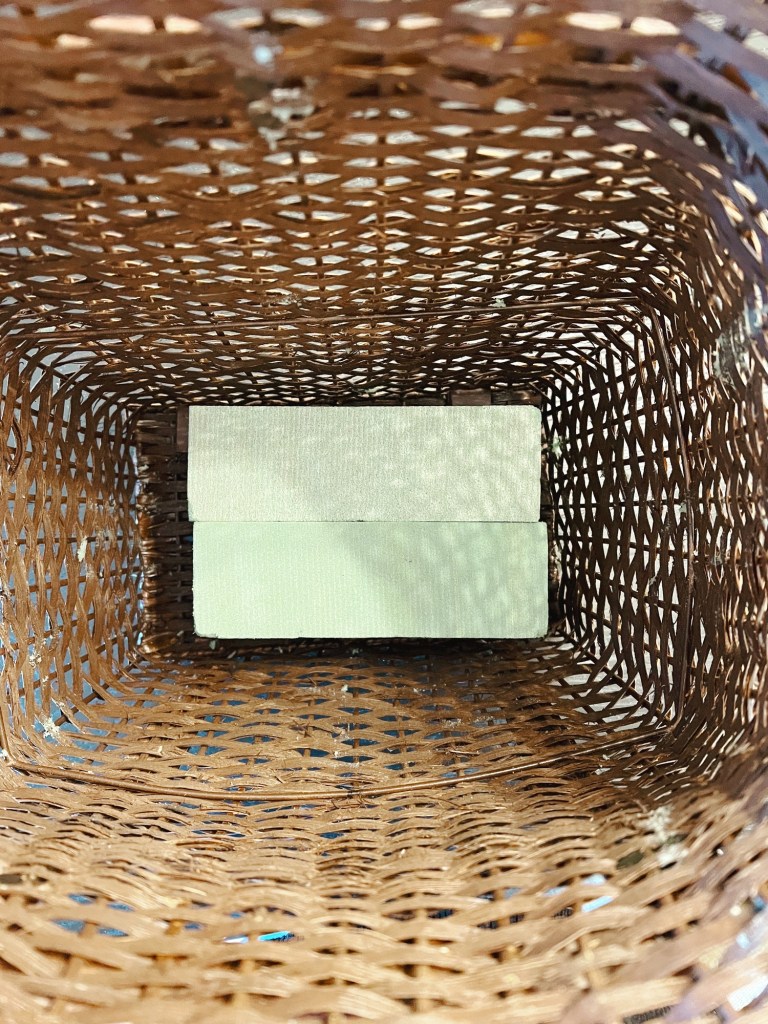
Step 1: Prep your floral foam blocks
Trim your floral foam blocks to fit in the bottom of your basket, if necessary. The basket I used just happened to fit two blocks laid on their sides perfectly.

Step 2: Trim your floral stems
Because the basket is tall, I used florals with long stems. I measured each against the side of the basket and then trimmed to fit. I used four long hydrangea stems for this project. Normally I would used an odd number like five, since odd numbers work best in design, but Michaels only had four at the time. The design gods will have to forgive me.


Step 3: Arrange the larger blooms first
Since the hydrangeas are the focal point of this arrangement I added them first. I then filled in the areas behind and between them with the taller cherry blossoms. Moss tucked into the bottom hides the stems and the bottom of the basket.


Step 4: Fill in any gaps with smaller florals
To make the arrangement more full and lush, I took apart an old hydrangea wreath that had seen better days. I tucked the blossoms in any areas that looked less full. I was able to reuse the leaves too, which added some greenery to the arrangement. The blossoms and leaves aren’t attached or glued to anything because I want to be able to change out the arrangement later on. For more on how to reuse old wreaths, be sure to check out the post How to Upcycle an Old Wreath Into a Pretty Centerpiece.


Step 5: Add a bow
For a larger impact I added a layered bow to the basket. I coordinated the ribbon colors with the flowers. To make the bow, I layered three different kinds of ribbon, starting with a wide burlap ribbon. First, I tied the burlap ribbon around the neck of the basket into a bow. Then I created a smaller, layered bow with the remain two kinds of ribbon and wired them to the first bow. (Be sure to use wired ribbon for this project unless you want a droopy bow!) For details on how to make the rest of the bow, please see the post How to Make a Beautiful Fall Door Hanger.


Step 6: Enjoy!
I recommend placing this arrangement in a sheltered area to keep the blooms and basket looking fresh. I placed ours on our front door for photos, but I ultimately decided it looked even better above the bench on our porch.


Collaborating With… MaryJo@Master”pieces” of my Life
Be sure to head over to visit MaryJo at Master”pieces” of my Life for more Spring Basket Decor ideas! Here’s a sneak peek of what she’s got going on! So pretty! Please stop by her blog if you haven’t already! You can also find her on Pinterest | Instagram | Facebook & @masterpiecesofmylife.com.

Pin It!

Follow Me!
For more great craft ideas and coastal decor inspiration follow me on Hometalk and Redesigndaily!


Subscribe
Be sure to subscribe below to be notified of future posts! Have a great day!
Also sharing on https://betweennapsontheporch.net/
Discover more from From the Bay to the Beach
Subscribe to get the latest posts sent to your email.

2 Responses
So pretty! Looks great. XO- MaryJo
Thanks MaryJo!